 Save
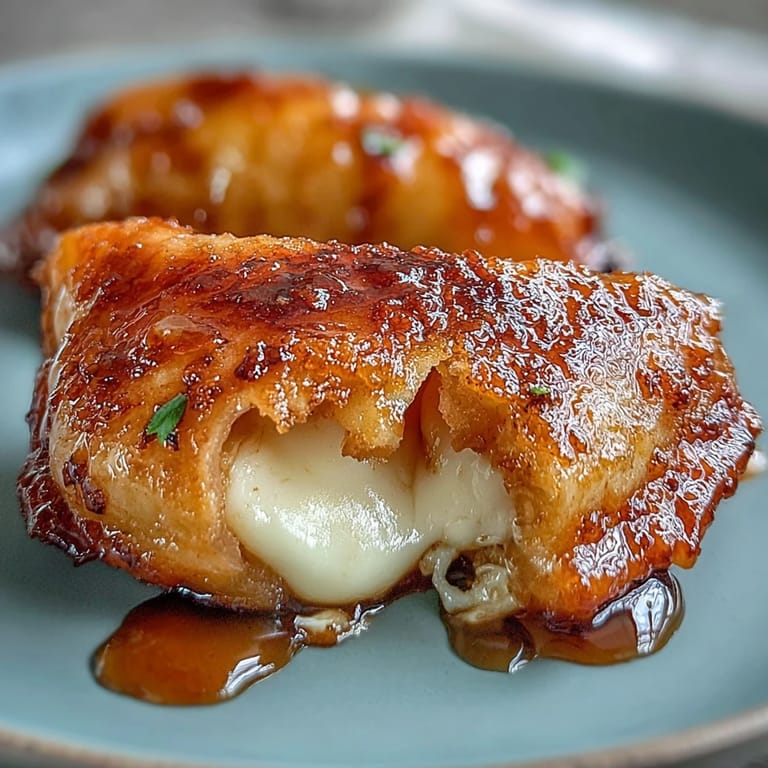
Save The first bite of imomochi I ever tried wasn't at a restaurant or izakaya, it was at a small festival stall in Hokkaido where an older woman shaped them with hands so fast I could barely follow. She pressed a cube of cheese into each warm potato disk, sealed it shut, and dropped it onto a sizzling griddle already slick with oil. The smell of browning potato and bubbling cheese hit me before I even got my order, and when I finally bit into one, the contrast between crispy golden edges and molten cheese center made me understand why the line never seemed to shrink.
I started making these on weeknights when I needed something comforting but didn't want to commit to a full dinner production. The dough comes together while the potatoes are still warm, which makes everything easier to work with. I learned quickly that dividing the dough before it cools keeps the portions even and prevents me from overworking it. Now I shape them while listening to music or a podcast, and the repetitive motion has become something I actually look forward to.
Ingredients
- Russet potatoes: Their high starch content makes the dough soft and cohesive without being gummy, and they mash smoother than waxy varieties.
- Potato starch or cornstarch: This is what gives the mochi its signature chew and helps bind everything without gluten.
- Unsalted butter: A small amount adds richness and helps the dough stay pliable as you shape it.
- Mozzarella cheese: Melts beautifully and stays gooey even after cooling slightly, though cheddar or gouda work if you want a sharper flavor.
- Soy sauce: The savory backbone of the glaze, it caramelizes slightly in the pan and clings to every surface.
- Honey: Balances the saltiness and helps the glaze thicken into a glossy coating.
- Mirin: Adds a subtle sweetness and depth that plain sugar can't replicate.
- Rice vinegar: A touch of acidity keeps the glaze from feeling too heavy or one-note.
- Neutral oil: Canola or vegetable oil works best for frying without adding competing flavors.
Tired of Takeout? 🥡
Get 10 meals you can make faster than delivery arrives. Seriously.
One email. No spam. Unsubscribe anytime.
Instructions
- Boil the potatoes:
- Place the peeled and chopped potatoes in a pot of salted water, bring to a boil, and cook until they break apart easily with a fork, about 12 to 15 minutes. Drain them well so no excess water dilutes the dough.
- Mash and season:
- Mash the potatoes until completely smooth, then stir in the butter and salt while they're still warm so everything melts together evenly. The heat helps the starch activate and makes the dough easier to handle.
- Form the dough:
- Add the potato starch and knead gently until a soft, slightly tacky dough forms. If it sticks to your hands too much, dust in a little more starch, but don't overdo it or the mochi will lose its chew.
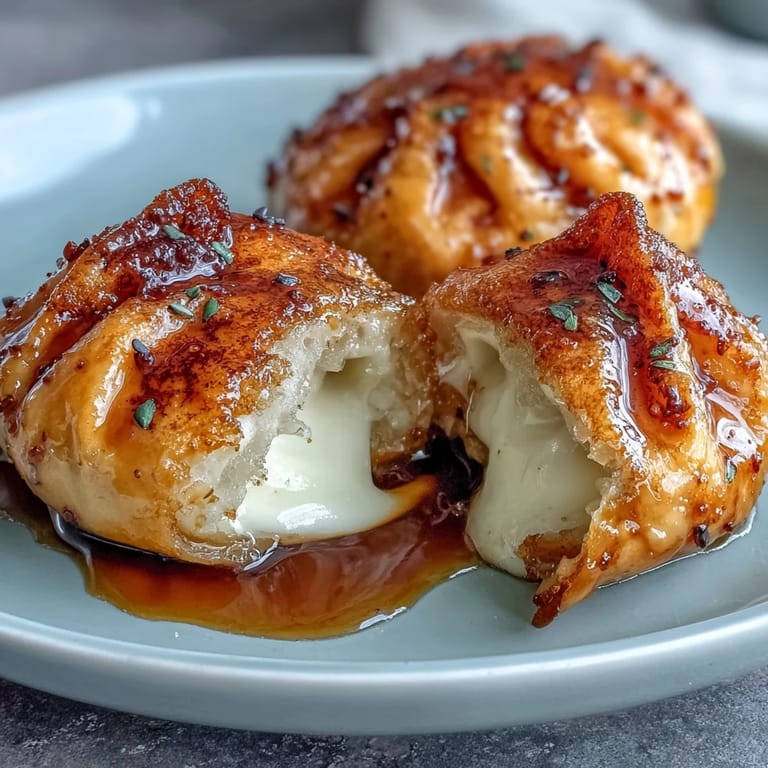
- Shape and fill:
- Divide the dough into 8 equal pieces, flatten each into a disc, and place a cube of cheese in the center. Pinch the edges up and around to seal, then roll gently into a ball so the cheese stays hidden inside.
- Pan-fry until golden:
- Heat the oil in a nonstick skillet over medium heat, add the dumplings, and cook them slowly, turning every couple of minutes until all sides are crispy and golden brown, about 6 to 8 minutes total. Don't rush this step or the insides won't heat through.
- Glaze and finish:
- Mix the soy sauce, honey, mirin, and rice vinegar in a small bowl, then pour it into the skillet with the dumplings. Toss gently and let the sauce bubble and thicken for 1 to 2 minutes until everything is glossy and coated.
- Serve warm:
- Transfer to a plate and optionally garnish with sliced scallions or toasted sesame seeds. Serve immediately while the cheese is still molten and the glaze is sticky.
 Save
Save I brought a batch of these to a potluck once, still warm in a covered dish, and they disappeared faster than anything else on the table. Someone asked if I'd ordered them from a restaurant, and I just smiled and said they were easier to make than they looked. That night I wrote the recipe down properly for the first time, because I knew I'd be making them again and again, and I wanted to remember the exact proportions that worked.
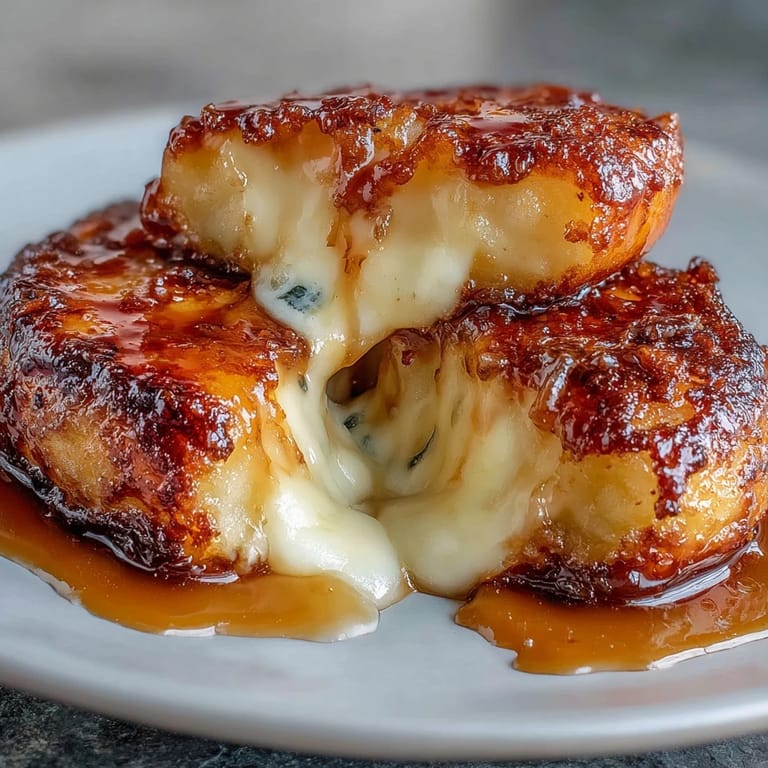
Choosing Your Cheese
Mozzarella is classic because it melts smoothly and pulls apart in those satisfying cheese strings, but I've also used sharp cheddar when I wanted more flavor, and gouda when I had some left over from a cheese board. Each one changes the character of the dish slightly, cheddar adds a tangy richness, gouda brings a creamy sweetness, and mozzarella stays mild and lets the glaze shine. If you're feeling adventurous, try a mix of two cheeses in each dumpling for a more complex melt.
Making It Ahead
You can shape the dumplings and freeze them on a parchment-lined tray, then transfer them to a freezer bag once solid. When you're ready to cook, fry them straight from frozen over slightly lower heat so they warm through without burning on the outside. I've done this on busy weeknights and it feels like having a secret stash of homemade comfort food ready to go whenever I need it.
Serving Suggestions
These are perfect as an appetizer before a Japanese-inspired dinner, but I've also served them alongside a crisp cucumber salad or pickled vegetables to cut through the richness. Sometimes I drizzle a little extra glaze on top and sprinkle them with sesame seeds and thinly sliced scallions for color and crunch. They're also great as a snack with a cold beer or a cup of green tea, and kids seem to love them just as much as adults do.
- Serve with a side of pickled ginger or a quick cucumber sunomono for brightness.
- Pair with miso soup and steamed edamame for a light meal.
- Reheat leftovers in a hot skillet with a splash of water to refresh the glaze.
 Save
Save There's something deeply satisfying about biting into something crispy on the outside and finding warm, stretchy cheese hidden inside. These little dumplings have become one of those recipes I make when I want to feel grounded in my kitchen, and every time I pull them off the heat and watch the glaze cling to the golden edges, I'm reminded why I fell in love with them in the first place.
Recipe Q&A
- → Can I make these ahead of time?
Yes, you can shape the dumplings and refrigerate them covered for up to 24 hours before frying. You can also freeze them for up to 1 month and cook from frozen, adding a few extra minutes to the cooking time.
- → What type of cheese works best?
Mozzarella is ideal for its stretchy, melty texture, but you can use cheddar for sharpness, gouda for richness, or any semi-soft cheese that melts well. Avoid hard cheeses like parmesan.
- → Can I substitute the potato starch?
Yes, cornstarch works as a substitute, though potato starch gives a chewier, more authentic mochi texture. Tapioca starch is another good alternative if available.
- → How do I prevent the dumplings from sticking to the pan?
Use a good nonstick skillet and ensure it's properly heated with enough oil before adding the dumplings. Avoid moving them too much initially to allow a crust to form.
- → What should I serve these with?
They're delicious on their own or with a dipping sauce like spicy mayo or ponzu. Serve alongside a fresh salad, pickled vegetables, or as part of a Japanese-style appetizer spread.
- → Why is my dough too sticky to work with?
Add potato starch gradually, one tablespoon at a time, until the dough is pliable but slightly sticky. Wet your hands lightly when shaping to prevent excessive sticking.