 Save
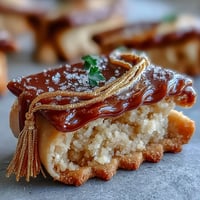
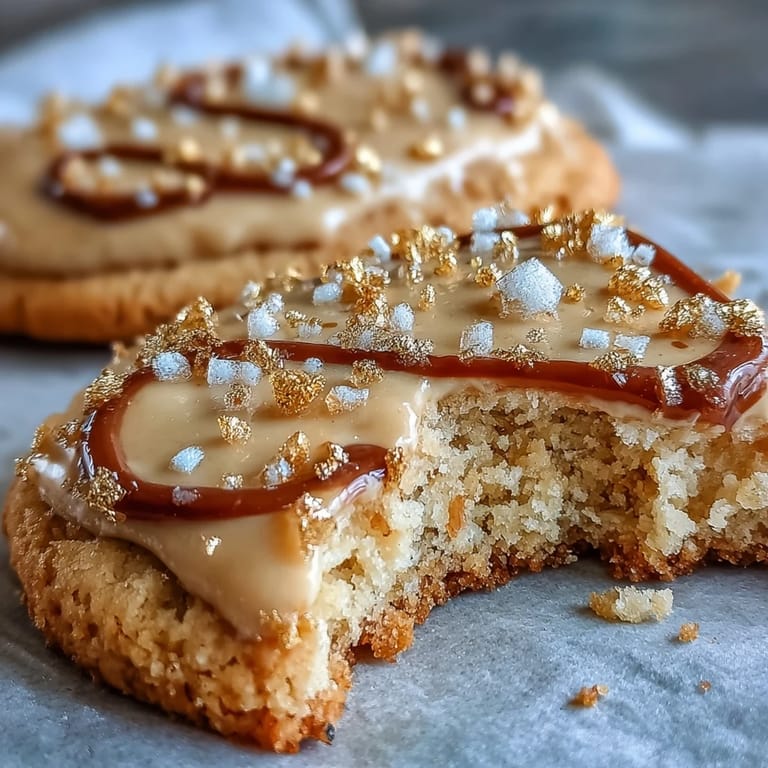
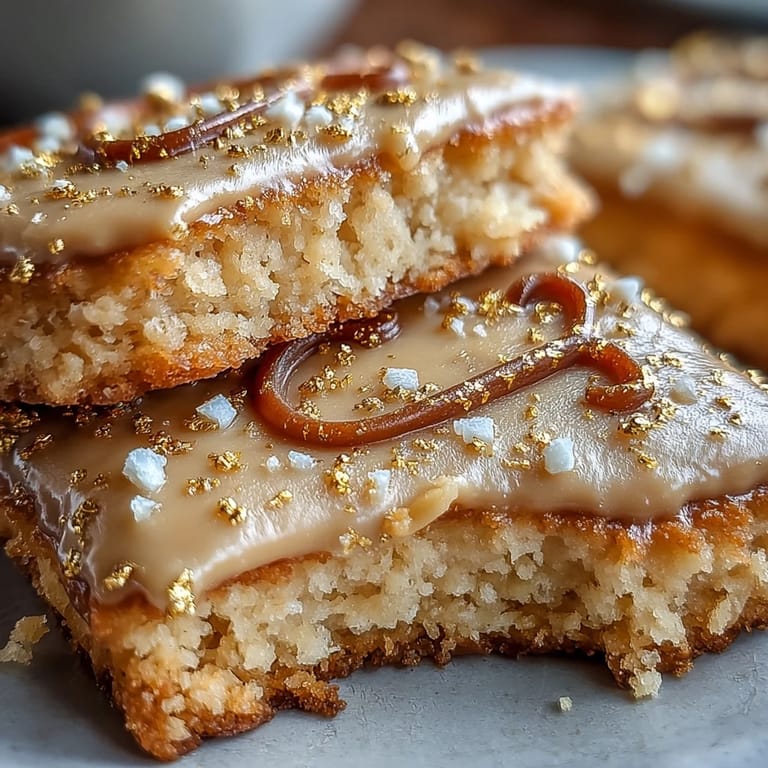
Save The very first time I pulled a tray of Taurus Zodiac Cookies from the oven, my kitchen filled with that unmistakable, sweet buttery warmth that always reminds me why I love baking. I’d planned to whip up plain sugar cookies, but upon stumbling across a set of zodiac cookie cutters, inspiration struck—a little constellation magic couldn’t hurt a weekend afternoon. The promise of gold luster dust for painting was too decadent to resist; I was practically giddy as I rummaged for my finest paintbrush. Making these cookies became less about the end product and more about the process—measured, unhurried, and just a little bit luxurious. And honestly, the golden swirls and star signs were as satisfying to create as they were to eat.
Last spring, I brought a box of these Taurus cookies to a friend's backyard birthday—a Taurus, of course—and watched guests light up as they realized each constellation and horned symbol had been brushed by hand. I remember someone asking me, sotto voce, if the edible gold was real (as we tucked into the cookies with pinkies up, just because). That afternoon felt like a living room under the stars, even with a gentle breeze trying to steal away napkins. It’s amazing how a simple box of cookies can spark the best kind of conversation at a gathering. That’s when I realized: these cookies aren’t just for eating, they’re for bestowing a little stardust.
Ingredients
- All-purpose flour: For sturdy cookies that hold their shape, I learned to measure the flour with the spoon-and-level method rather than scooping straight from the bag—lessens the risk of tough cookies.
- Unsalted butter: Using butter at true room temperature is the trick; I leave it out until it leaves a finger print but doesn’t melt.
- Granulated sugar: Creamed until fluffy, it gives the cookies their signature tender crumb and golden edges.
- Large egg: Be sure it’s at room temp; makes for smooth, even dough every time.
- Pure vanilla extract: Good vanilla is like a cozy blanket here—warming and wonderful in each bite.
- Almond extract (optional): Go easy, as it’s potent, but it transforms the aroma into something truly almond-bakery.
- Salt: A dash balances out the sweetness and sharpens all those flavors.
- Powdered sugar (for icing): Always sift it first for the silkiest royal icing without any lumps.
- Egg whites or meringue powder: For icing that sets up glossy and safe to paint on—meringue powder’s great if you’re nervous about raw eggs.
- Lemon juice: Lemon cuts through the sugar for icing that doesn’t overwhelm, just brightens.
- Edible gold luster dust: This magical touch turns cookies into little treasures—just mix it with a bit of clear alcohol for the best shimmer.
- Clear alcohol (vodka or lemon extract): Helps the gold dust dry quickly without making the icing soggy; vodka leaves no flavor.
Tired of Takeout? 🥡
Get 10 meals you can make faster than delivery arrives. Seriously.
One email. No spam. Unsubscribe anytime.
Instructions
- Cream and Mix:
- Let’s start by beating the butter and sugar together until it’s light, airy, and almost looks whipped. Crack in the egg, drizzle in vanilla and almond extracts, and keep mixing until it’s smooth and creamy.
- Combine Dry and Bring Together:
- In a separate bowl, whisk the flour and salt; sprinkle this into the butter mixture, stirring gently until a soft dough forms—it’ll smell incredible.
- Chill and Prep:
- Divide the dough, press each half into a disc, wrap well, and chill for at least half an hour; this step keeps the shapes crisp and defined.
- Roll and Cut:
- Press the dough out on a floured surface until it’s a quarter-inch thick, then go wild with Taurus or other zodiac shapes—press straight down for good clean edges.
- Bake to Perfection:
- Arrange on parchment-lined trays with a bit of space and bake in a 350°F oven; watch the edges go just golden and pull them once they set and smell toasty-sweet.
- Cool and Prepare Icing:
- Let the cookies cool completely before you touch the icing—then whip egg whites (or meringue powder and water), slowly beating in powdered sugar until it’s thick and glossy.
- Icing Time:
- Add a dash of lemon juice and vanilla, divide if you like, and spoon into piping bags; outline, then flood each cookie, giving them time to set glossy and firm.
- Gold Detailing:
- Once the royal icing dries (patience!), mix gold luster dust with a few drops of vodka and paint symbols or sparkles on top—don’t rush this, it’s soothing work.
- Box and Present:
- Arrange your masterpieces snugly in a parchment-lined gift box; if you have a zodiac card or a little quote, tuck that inside for some extra Taurus charm.
 Save
Save  Save
Save I still remember one afternoon when my cousin and I spent hours at the kitchen table, surrounded by edible gold dust and tiny constellation references on our phones. Each cookie we painted was a tiny piece of star art, and for a moment, the world shrank down to laughter, stories, and sparkly fingertips. Later, she texted me a photo of the empty box with a line: ‘The stars taste like vanilla and gold.’ Those simple gestures are why I bake these cookies for people I love. The act of sharing them becomes its own golden memory.
Decorating with Gold: My Favorite Touch
Piping the royal icing might seem tricky at first, but it’s honestly just a matter of letting yourself make a few wobbly lines—those little imperfections are part of the homemade charm. The first time I brushed on the edible gold, I realized a light hand works best; too much can overwhelm the details, but a gentle glimmer turns each cookie into something special. Don’t worry if your Taurus symbols look more like a funky bull or a confused constellation—they still shine brightly once boxed up. Gold luster dries almost instantly with vodka, so you can stack the cookies without fear of smudging. Whenever I see that glint in the box, I know it’s worth the extra step.
Making Them Ahead: Storage Tips
If you want to bake these ahead of time, I’ve found the cookies freeze beautifully before decorating—as long as they’re packed in airtight containers with parchment in between. Once decorated, let them dry overnight before arranging in a box, and store at cool room temperature to preserve those shiny gold accents. Avoid humid days if you can; royal icing can go tacky fast when the air feels heavy. For an added wow factor, wrap each cookie individually or cushion them with color-coordinated tissue paper. Your Taurus cookie box will still look stellar after days on the counter.
Experimenting with Flavors and Accents
Citrus zest in the dough gives these cookies a springtime zip, while adding a dash of rose or almond extract can tilt them into fragrant, elegant territory. Sometimes I’ll add hints of pistachio or dress them up with green sprinkles for earthy Taurus flair. Vegan swaps are easy here—vegan butter and aquafaba in place of eggs mean everyone gets a taste. Each batch is a new canvas for creativity and you can switch up the shapes for different zodiac friends, too.
- Keep the cookie shapes consistent for neat boxing.
- Do a practice run with the gold paint on a piece of parchment first.
- Never box the cookies until both the icing and gold are completely dry.
 Save
Save  Save
Save Share these Taurus Zodiac Cookie Boxes with the stargazers in your life, or just enjoy painting a little edible sparkle on a slow afternoon. However you serve them, let the ritual bring a little bit of luxe and whimsy to your kitchen.
Recipe Q&A
- → How do I prevent cookies from spreading?
Chill the dough well before rolling and again after cutting if needed. Use chilled baking sheets and avoid overcreaming the butter and sugar to keep edges from running.
- → How thick should I roll the dough?
Roll to about 1/4 inch for a sturdy cookie that bakes evenly and holds detailed icing work without becoming too delicate.
- → What consistency should the royal icing be for flooding?
Flooding icing should flow slowly off a spatula and level within 10–20 seconds. Thicken outline icing to hold shape, and use thinner flood icing to fill.
- → Is edible gold luster dust safe to use for painting?
Use luster dust labeled edible or food-grade. Mix with a few drops of clear food-safe alcohol (vodka) or lemon extract to create a paint that sets on dry royal icing.
- → Can I swap ingredients for dietary needs?
Yes — use vegan butter and aquafaba instead of egg for a vegan version, and check meringue powder or substitutes that match your dietary requirements.
- → How should I store the finished cookies?
Store fully dried cookies in a single layer separated by parchment in an airtight box at room temperature for up to a week; add padding to protect gold detailing.