 Save
Save Listening to the sharp click of my rolling pin as it smacked against the countertop, I knew these cookies would mark more than just an afternoon in the kitchen. The smell of melting butter and sweet vanilla drifted through the house as old graduation songs played from my phone speaker. Precision was suddenly part of the fun: cutouts in neat cap-and-diploma shapes, a dusting of flour on my hands, and the thrill of anticipation for the golden accents yet to come. Somehow, the decorating became a quiet celebration itself—a chance to add a flourish of gold to an ordinary day. Baking these cookies never felt like work, but like a way to lend a little sparkle to a milestone moment.
Once, I baked these for my cousin&apost;s graduation, the kitchen crowded with laughing relatives sneaking raw dough or staring hungrily at racks of cooling cookies. My nephew insisted on adding more gold to his 'diploma,' and a small army of sticky fingers left their marks on the parchment paper. The cookies spent just as much time being admired as they did being eaten.
Ingredients
- All-purpose flour: Gives the cookies a sturdy, tender bite; I always spoon it lightly into measuring cups and level with a knife for accuracy.
- Unsalted butter: Room temperature butter whips up luxuriously, and chilling the dough afterward helps minimize spreading.
- Granulated sugar: Not just for sweetness—it helps the cookies hold their shape under the heat.
- Large egg: Binds the dough while adding a little richness to the crumb.
- Pure vanilla extract: A dash goes a long way for fragrance; I sometimes splash in a little extra when feeling bold.
- Almond extract (optional): This deepens the flavor, but a lemon swap lifts the profile on fresher, warmer days.
- Salt: Just a pinch brightens every other ingredient and balances the sweetness.
- Powdered sugar: Sifted well, it makes royal icing smooth—clumps here can ruin perfect lines.
- Egg whites or meringue powder: Both whip up a glossy, forgiving icing, but meringue powder makes things simpler if little hands want to help.
- Cream of tartar: Helps the icing stabilize and stay fluffier for longer decorating sessions.
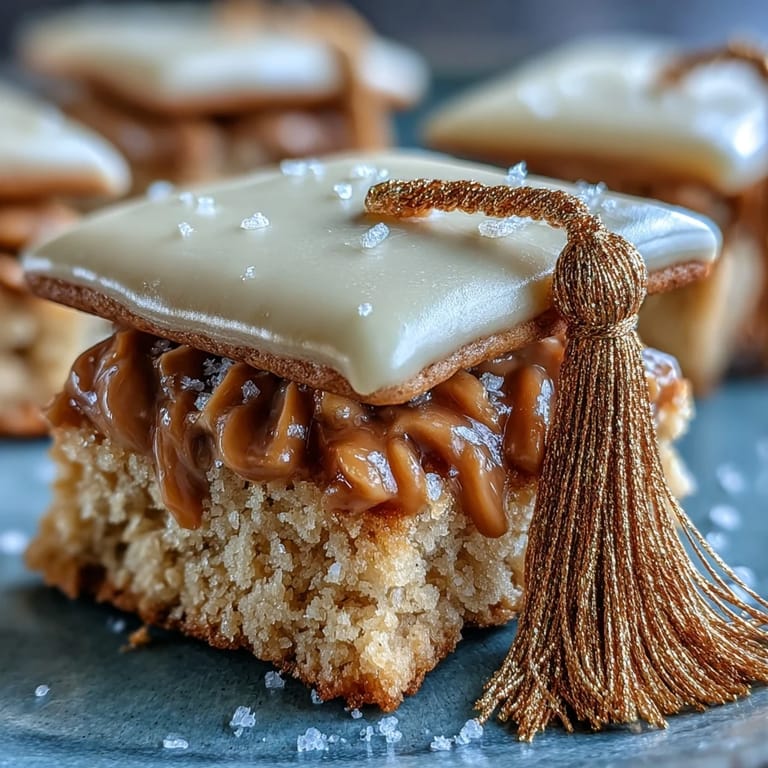
- Black gel food coloring: Essential for crisp, dramatic mortarboards; go slowly—a little color goes a long way.
- Gold edible luster dust + clear alcohol or lemon extract: The last touch that brings every detail to life; I learned to mix the dust very well for even shimmer.
Tired of Takeout? 🥡
Get 10 meals you can make faster than delivery arrives. Seriously.
One email. No spam. Unsubscribe anytime.
Instructions
- Cream Butter & Sugar:
- Beat butter and sugar together until the mixture is pale and fluffy—the scent hints at shortbread and promises sweetness ahead.
- Add Eggs & Flavor:
- Blend in the egg, vanilla, and almond or lemon extract, pausing to scrape the sides so nothing escapes the party.
- Mix Dry Ingredients:
- Slowly sift and pour in the flour and salt, watching the dough come together—stop as soon as the last flour streak vanishes.
- Chill the Dough:
- Shape into two discs, wrap them snugly in plastic, and send them to the refrigerator for a short nap—this pause keeps them sturdy during baking.
- Roll & Cut:
- Turn out chilled dough onto a floured surface and press it into an even slab, then cut out caps and diplomas, reclaiming any scraps for one last round.
- Bake:
- Carefully transfer cookies to lined sheets and slide them into the oven, letting the edges just barely blush golden before cooling completely.
- Prepare Royal Icing:
- Whip up egg whites and powdered sugar with cream of tartar until the peaks hold their proud shape, then swirl in vanilla and divide among bowls.
- Tint & Fill:
- Gently fold in black coloring for the caps, leave some icing white for diplomas, and keep a spare bowl for golden details.
- Decorate:
- Use piping bags to outline your cookies, flood with more icing, and add little touches for dimension; let them rest until the icing crusts over.
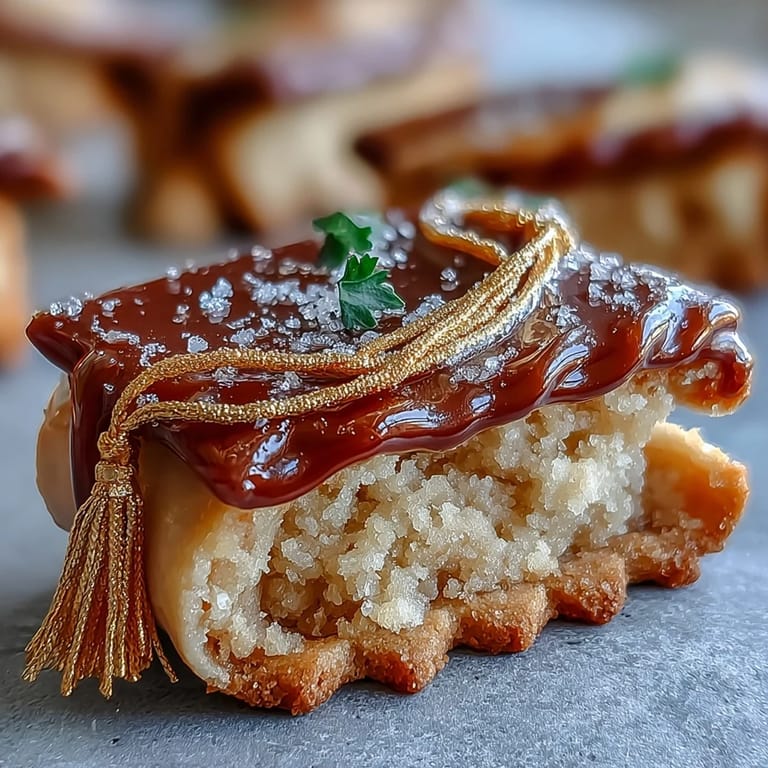
- Add Gold Accents:
- Blend luster dust with clear alcohol or lemon extract until paintlike, then sweep on bows and tassels—watch them gleam as they set fully before serving.
 Save
Save 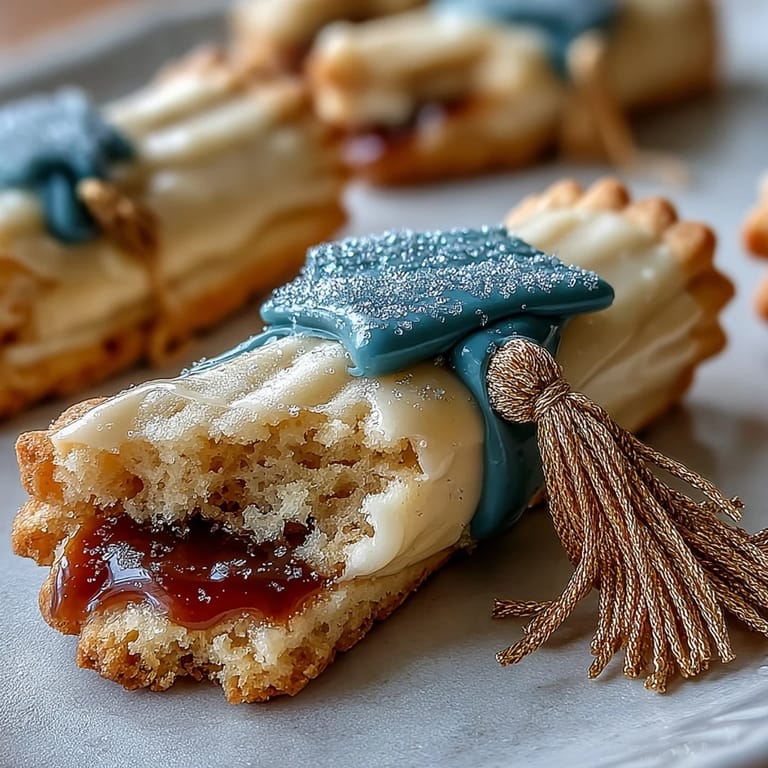 Save
Save The first time this recipe left the kitchen was for a friend who couldn't stop smiling at the personalized initials I added to each diploma cookie. They lined them up on the party table, surrounded by tassel keychains and scattered confetti, and even guests who claimed they didn't "like sweets" were soon quietly munching their second cookie by the punch bowl.
Working With Royal Icing (Without Tears)
Truthfully, royal icing intimidated me until I tried it with meringue powder. The trick is to keep an eye on the icing's consistency; too runny and the outlines will vanish, too thick and it won't flood smooth. I always cover the bowls with plastic wrap or a damp towel between colors—dried-out icing is only good for gluing gingerbread, not for pretty cookies. Invest in a few piping bags with fine tips to help make the details pop, and keep a toothpick handy to coax icing into tight corners.
Chilling Your Dough Makes A Difference
When I get impatient and skip chilling time, the cookies lose their crisp edges and the graduation caps blur into blobs. Giving the dough a solid forty-five minute rest means all my hard work with the cutters actually pays off. While the dough chills, I prep the decorating area—wrangling parchment, arranging my piping colors, and making sure everything is within arm's reach so I don't make a sticky mess every time I go hunting for a brush or bag.
Adding Gold Accents Like A Pro
Mixing edible luster dust with clear alcohol or lemon extract transforms a pinch of powder into a magical, brushable gold paint, but don't rush the mixing. Stir until the texture is smooth and not gritty so every brushstroke glides. I use a tiny, food-safe paintbrush for precision, and a few thin coats look much classier than one thick blob. Let the cookies dry completely before stacking or serving.
- Store finished cookies in a single layer at first to prevent smudging.
- Clean your brushes between gold and black details for crisp lines.
- Give yourself time to let the icing set—patience pays off in dazzling results.
 Save
Save  Save
Save Cherish every messy, memorable moment creating these cookies; sometimes the sweetest victories are the ones we get to share and admire together.
Recipe Q&A
- → How long should the dough chill?
Chill the dough at least 45 minutes so it firms up for clean cutting; longer chilling helps prevent spreading during baking and keeps shapes sharp.
- → Can I use meringue powder instead of fresh egg whites for royal icing?
Yes. Use the equivalent meringue powder blend with water as directed for a stable royal icing that’s easier to store and safer for make-ahead decorating.
- → How do I get a smooth flood finish with royal icing?
Thin piping consistency with a few drops of water until it levels slowly; pipe an outline first, then flood the center and use a toothpick to coax icing into corners.
- → What’s the best way to apply edible gold accents?
Mix gold luster dust with a clear, food-safe alcohol or lemon extract to make a paint, then use a fine food-safe brush to add tassel and ribbon highlights once icing is dry to the touch.
- → How should I store decorated cookies?
Once icing is fully dry, layer cookies with parchment in an airtight container at room temperature; they keep well for up to one week.
- → Why did my cookies spread or lose detail?
Overworked dough, insufficient chilling, or warm dough can cause spreading. Chill the dough, avoid excess flour while rolling, and bake at the correct temperature until edges are just golden.