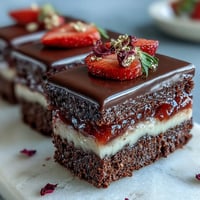
 Save
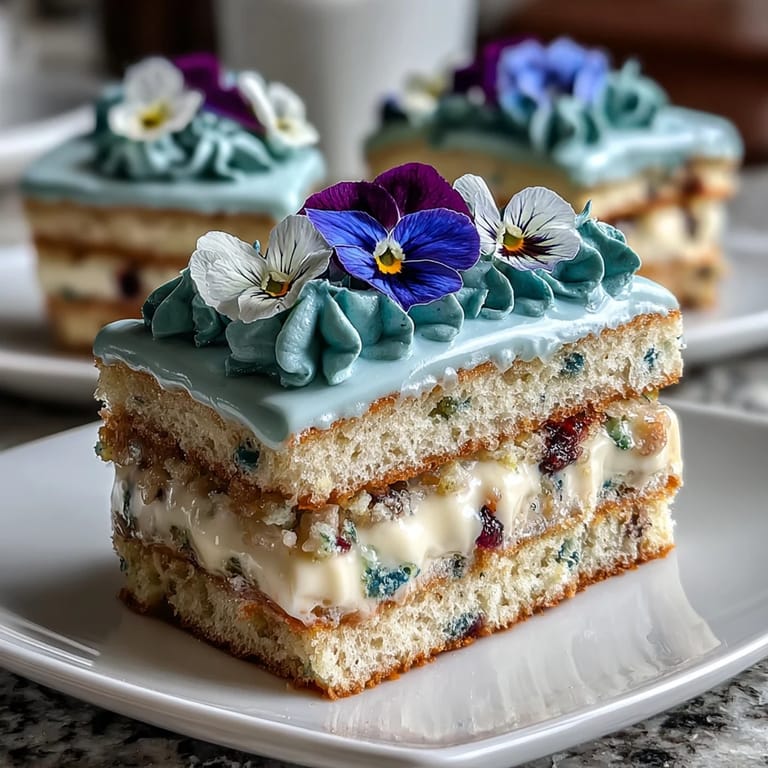
Save My friend texted me three weeks before her birthday asking if I could make something special, something that looked like it belonged in a fancy bakery but tasted like home. I'd been experimenting with mini cakes that spring, cutting perfect circles from sheet cake and stacking them with clouds of buttercream, and suddenly I knew exactly what to do. When I placed those first edible flowers on top—tiny purple violas that caught the afternoon light—she walked into my kitchen and actually gasped. That moment taught me that the most memorable desserts aren't always the most complicated; they're the ones that show someone you took time to make them feel celebrated.
I still remember assembling these for my neighbor's daughter's sixteenth birthday—the kitchen smelled like butter and vanilla, and the girl's younger brother kept sneaking tastes of buttercream while I wasn't looking. By the time I'd finished decorating, he'd convinced me to make a seventh one just for him, which somehow became the best part of the whole afternoon. Those little cakes became the thing everyone talked about more than the actual party did.
Ingredients
- All-purpose flour (1 1/4 cups): The foundation that keeps these cakes tender rather than dense; weigh it if you can, as measuring by cup can pack it down and make everything too heavy.
- Baking powder (1 tsp): This is what gives you that delicate crumb structure that lets the cakes absorb buttercream without falling apart during assembly.
- Salt (1/4 tsp): A small amount that quietly makes the vanilla and lemon sing instead of sitting flat.
- Unsalted butter (1/2 cup for cake, 3/4 cup for buttercream): Room temperature butter is non-negotiable here because cold butter won't incorporate smoothly into the batter, and you need that airy texture.
- Granulated sugar (3/4 cup): This creams with the butter to trap air, creating the light crumb that distinguishes these from dense, heavy cakes.
- Eggs (2 large, room temperature): Cold eggs won't blend properly and can create a grainy texture; pull them out of the fridge while you're prepping everything else.
- Pure vanilla extract (1 tsp for cake, 1 tsp for buttercream): Pure vanilla tastes noticeably better than imitation, and it makes these feel like something special rather than ordinary.
- Lemon zest (1/2 tsp): Fresh zest from an unwaxed lemon brightens the whole cake and pairs beautifully with the delicate buttercream.
- Whole milk (1/2 cup, room temperature): The milk loosens the batter just enough so it spreads evenly on the sheet pan without being too thick or too thin.
- Powdered sugar (2 cups): Sift it first, always; lumpy buttercream will never beat into silky clouds no matter how long you try.
- Edible flowers (1 cup, about 30 grams): Source these from a reputable supplier where you can confirm they're pesticide-free; grocery store flowers often aren't safe to eat, so don't skip this step.
Tired of Takeout? 🥡
Get 10 meals you can make faster than delivery arrives. Seriously.
One email. No spam. Unsubscribe anytime.
Instructions
- Set yourself up for success:
- Preheat your oven to 350°F and line a 9x13 inch baking sheet with parchment paper, then give it a light grease so nothing sticks. Gather all your ingredients and pull the butter, eggs, and milk out so they come to room temperature while you measure—this small step changes everything about how smoothly the batter comes together.
- Build your dry ingredients:
- Whisk together the flour, baking powder, and salt in a medium bowl, making sure there are no hidden lumps of baking powder that could create bitter pockets in your cake. This only takes a minute, but it ensures even leavening throughout.
- Cream butter and sugar until it looks like pale sand:
- Beat the softened butter and sugar together for about 3 minutes until the mixture is light, fluffy, and noticeably paler than when you started. This aerating step is what gives these cakes their tender, almost cloud-like texture.
- Add eggs one at a time, with patience:
- Drop in one egg, beat until it disappears completely into the batter, then repeat with the second egg. Rushing this creates a broken-looking batter that won't incorporate smoothly, so listen for the mixer and wait for each egg to fully combine.
- Fold in the vanilla and lemon zest:
- Mix these in gently after the eggs are fully incorporated, and you'll immediately smell the brightness they bring to the batter. The zest adds flavor without adding moisture, which keeps your cakes delicate.
- Alternate flour and milk in a three-part rhythm:
- Add half the flour mixture and stir gently, then pour in the milk and stir gently, then add the remaining flour and stir until just combined. Overmixing at this stage develops gluten and makes cakes tough, so stop as soon as you don't see dry streaks.
- Spread and bake until golden:
- Pour the batter onto your prepared sheet and use an offset spatula to spread it into an even layer that fills the whole pan without being too thick. Bake for 18–22 minutes until a toothpick inserted in the center comes out clean and the cake is just starting to turn golden.
- Cool completely before cutting:
- Let the cake sit on the baking sheet for a few minutes, then turn it out onto a wire rack and let it cool all the way down; warm cake crumbles when you try to cut it, so patience here prevents frustration later. This might take 30 minutes, but it's worth every minute.
- Cut out perfect circles:
- Using a 2.5–3 inch round cutter (I like to warm mine under hot water first so it cuts cleanly), press straight down without twisting to create 12 clean circles. Save the scraps for munching or cake pops.
- Make your buttercream clouds:
- Beat the softened butter until it's creamy and pale, then gradually add the sifted powdered sugar a little at a time so it doesn't puff up and coat your kitchen. Once it's combined, add vanilla, salt, and 1 tablespoon of milk, then beat until the whole thing is light and fluffy.
- Tint if you want, but gently:
- If you're using food coloring, add just a drop or two and mix thoroughly before adding more; pastel shades look more sophisticated than bold colors and feel more springlike. You can make several small batches in different colors if you want each cake to have its own personality.
- Stack with intention:
- Place one cake circle on a plate, spread a thin but generous layer of buttercream on top, then place the second circle and add another thin layer of buttercream. The key is thin layers rather than thick ones; they look more elegant and taste better balanced.
- Crown with flowers:
- Pipe or spread a little more buttercream on top of each stacked cake, then arrange your edible flowers artfully—I usually put a few in the center and let one or two cascade over the edge. Take a step back and look at it before you commit; these little arrangements are what make people stop and stare.
- Chill before serving:
- Pop the finished cakes into the fridge for 15 minutes so the buttercream sets up and the whole thing holds together perfectly when someone takes that first bite. This also makes them easier to move if you're transporting them.
 Save
Save What struck me most was watching people's faces when they took that first bite—the surprise that something so pretty could taste this delicate and buttery, like someone had captured spring in cake form. It became clear to me that these weren't just desserts; they were little edible celebrations that made ordinary birthdays feel like something to remember.
The Secret to Silky Buttercream
The difference between lumpy, grainy buttercream and clouds of silky frosting comes down to one thing: sifting your powdered sugar before you add it. I learned this the hard way after beating lumpy buttercream for what felt like forever, watching it refuse to smooth out no matter how long the mixer ran. Now I sift into a separate bowl first, and the transformation is immediate—the buttercream comes together in half the time and looks noticeably better.
Why Sheet Cake Beats Individual Pans
Baking a single sheet cake instead of trying to get six mini cakes to bake evenly is actually genius, and here's why: sheet cakes bake faster and more evenly than individual pans, and you get to control the thickness perfectly since you're spreading it yourself. Plus, if one small area is slightly underbaked or overbaked, it doesn't ruin an entire cake—you just work around it when cutting out your circles. The scraps become snacks or cake pops, so nothing is wasted.
Making These Ahead and Keeping Them Fresh
I've discovered that assembling these cakes a few hours before serving gives the flavors time to meld and actually makes them taste better than eating them straight after assembly. The buttercream softens just slightly and the cake absorbs it in this perfect way that makes each bite taste cohesive rather than like separate layers. You can make the cake layers a day ahead and store them in an airtight container, then assemble and decorate just before serving or a few hours before, keeping them cool until it's time to eat.
- Store unfrosted cake layers in an airtight container at room temperature for up to 24 hours, or freeze them for up to a month if you want to get ahead.
- Buttercream keeps in the fridge for up to three days, so you can make it the morning of and let it soften slightly before using.
- Add your edible flowers as close to serving time as possible so they stay vibrant and don't wilt into the buttercream.
 Save
Save These little cakes proved to me that the most impressive desserts aren't always the most complicated—they're the ones made with intention and care, topped with something beautiful that shows someone you took extra time. Keep the recipe, make them for someone special, and watch their face light up when they see what you've created.
Recipe Q&A
- → What flour type is best for these cakes?
All-purpose flour provides the ideal structure and crumb for the tender layers, ensuring a soft yet sturdy texture.
- → How do edible flowers enhance the cakes?
Edible flowers add natural beauty and subtle floral notes, making the cakes visually appealing and seasonally fresh.
- → Can I tint the buttercream?
Yes, pastel food coloring can be added to the buttercream to create festive, colorful layers complementing the floral decoration.
- → What’s the best way to cut the cakes?
Use a 2.5–3 inch round cutter to neatly portion the baked sheet into uniform mini layers for consistent assembly.
- → Any tips for moist cake layers?
Room temperature ingredients and gentle mixing prevent overworking, while brushing with citrus syrup before layering adds extra moisture and flavor.