 Save
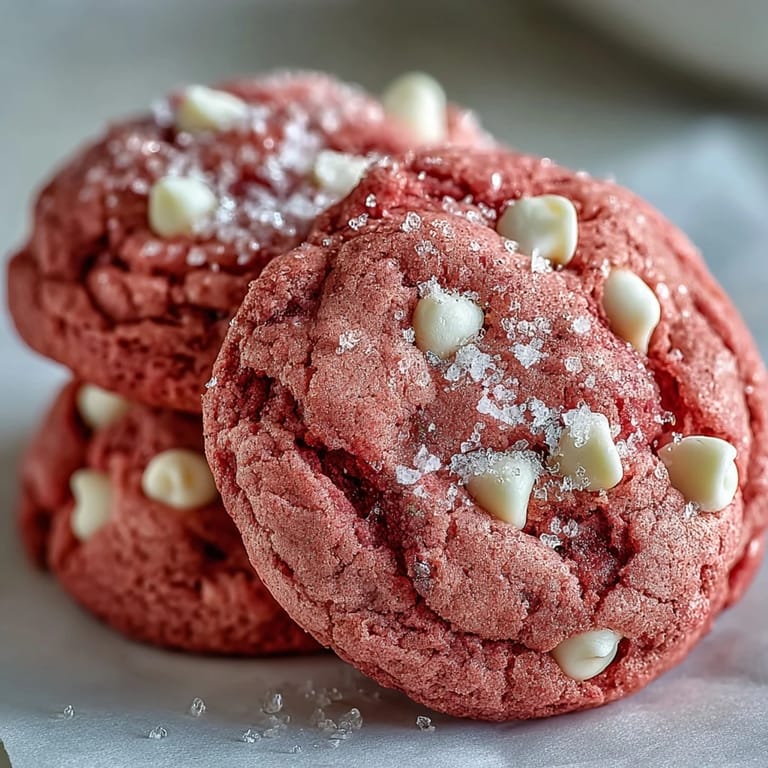
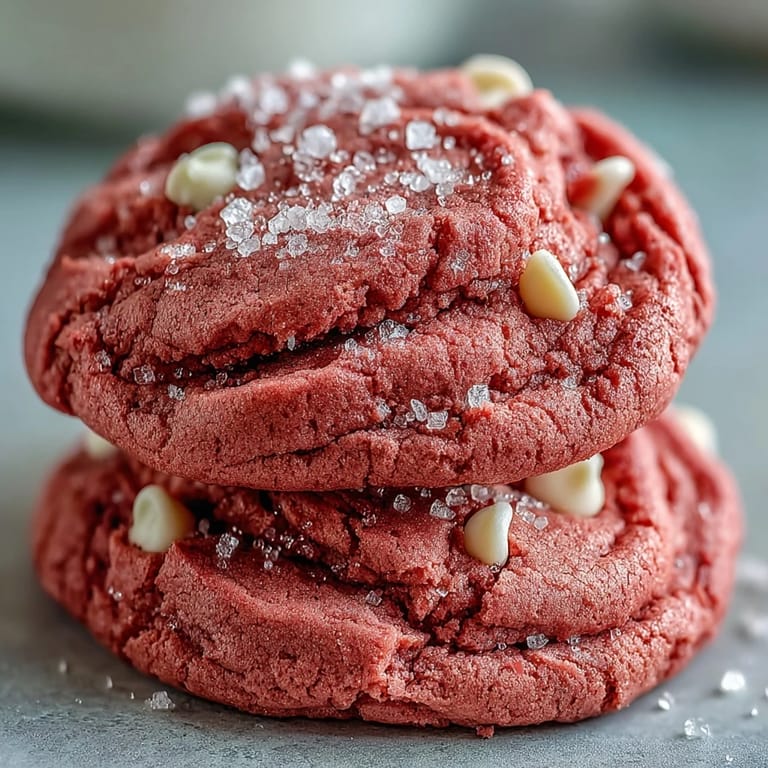
Save The kitchen smelled like butter and vanilla when I pulled that first tray out, but it was the color that stopped me cold. These cookies glowed pink under the oven light, almost too pretty to eat. I'd been experimenting with gel colors for weeks, trying to nail something vibrant without tasting artificial, and white chocolate chips turned out to be the perfect contrast. My neighbor peeked through the window and asked if I was baking for a baby shower. I wasn't, but by the end of the week, I had been asked to make three dozen for one.
I made these for my daughter's birthday party, and she insisted on helping measure the sugar. Flour ended up on the floor, and she added way too much food coloring to her test batch, turning them magenta. We laughed so hard we nearly forgot to set the timer. When her friends arrived, those bright pink cookies disappeared faster than anything else on the table. One kid asked if they were strawberry, and before I could answer, my daughter said they tasted like happiness.
Ingredients
- All-purpose flour (2 ½ cups): This gives the cookies structure without making them cakey, and I learned to spoon it into the cup instead of scooping directly to avoid dense results.
- Baking powder (1 teaspoon): It adds a subtle lift, keeping the cookies from spreading too thin and losing that soft middle.
- Baking soda (½ teaspoon): Just enough to help with browning and a slight chew, but not so much that they taste metallic.
- Salt (½ teaspoon): Balances all that sugar and makes the vanilla flavor pop in a way that surprised me the first time I tasted it.
- Unsalted butter (1 cup, softened): Room temperature butter creams beautifully and gives you control over the salt level, which matters more than I thought it would.
- Granulated sugar (1 ½ cups): Creaming this with butter creates tiny air pockets that make each bite melt on your tongue.
- Egg (1 large): Binds everything together and adds moisture, but don't add a second one or the cookies will puff up and lose their chewiness.
- Vanilla extract (2 teaspoons): I use the real stuff because imitation vanilla leaves a weird aftertaste that lingers in pink cookies for some reason.
- Pink gel food coloring (2 teaspoons): Gel is the only way to get that vibrant shade without thinning the dough, and a little goes a long way.
- White chocolate chips (1 cup): They stay creamy and sweet, and I've learned to fold them in gently so they don't sink to the bottom.
Tired of Takeout? 🥡
Get 10 meals you can make faster than delivery arrives. Seriously.
One email. No spam. Unsubscribe anytime.
Instructions
- Whisk the dry ingredients:
- Combine flour, baking powder, baking soda, and salt in a medium bowl until there are no streaks. Set it aside while you work on the butter and sugar.
- Cream the butter and sugar:
- Beat softened butter and sugar with a mixer for 2 to 3 minutes until the mixture turns pale and fluffy, almost like frosting. This step traps air and makes the cookies tender.
- Add egg, vanilla, and color:
- Beat in the egg and vanilla until smooth, then swirl in the pink gel food coloring and mix until the color is even. The dough will look almost neon at first, but it bakes down to a softer shade.
- Combine wet and dry:
- Gradually add the flour mixture on low speed, mixing just until no white streaks remain. Overmixing makes the cookies tough, so stop as soon as it comes together.
- Fold in white chocolate chips:
- Use a spatula to gently fold in the chips, making sure they're distributed evenly. I like to save a few to press on top of each dough ball before baking.
- Chill the dough:
- Cover the bowl with plastic wrap and refrigerate for 30 minutes. This keeps the cookies from spreading too much and helps them hold that thick, bakery style shape.
- Preheat and prep:
- Heat your oven to 350°F and line two baking sheets with parchment paper. Don't skip the parchment or the bottoms will brown too fast.
- Scoop and space:
- Use a tablespoon or cookie scoop to form balls of dough, placing them 2 inches apart. They'll spread just enough to get crispy edges while staying soft in the center.
- Bake until set:
- Bake for 10 to 12 minutes, watching for edges that look firm while the centers still seem a little underdone. They'll finish cooking on the pan after you pull them out.
- Cool and enjoy:
- Let the cookies sit on the baking sheet for 5 minutes to firm up, then move them to a wire rack. Eating one warm with melty white chocolate is the baker's reward.
 Save
Save One evening, I packed a tin of these cookies for a friend going through a rough patch. She texted me later that night saying she cried a little, not because of the cookies themselves, but because someone remembered her. The next week, she asked for the recipe. I realized then that pink cookies weren't just fun, they carried something warmer than sugar and butter. They showed up when it mattered.
Decorating and Variations
Press a few extra white chocolate chips on top of each dough ball before baking for a bakery style look. If you want to add a hint of almond or rose, just a half teaspoon of extract changes the whole flavor without overpowering the vanilla. I've also sandwiched two cooled cookies with cream cheese frosting for a treat that feels almost like a whoopie pie. Some people dust them with powdered sugar, but I think the pink is pretty enough on its own.
Storage and Make Ahead Tips
These cookies stay soft in an airtight container for up to a week, though mine never last that long. You can freeze the dough in scooped balls and bake them straight from the freezer, adding an extra minute or two to the bake time. Baked cookies also freeze well for up to three months if you layer them with parchment. I've pulled a few from the freezer on a random Tuesday and felt like I'd planned ahead for once.
Troubleshooting and Adjustments
If your cookies turn out cakey instead of chewy, you probably added too much flour or overbaked them. Measure flour by spooning it into the cup and leveling it off, never pack it down. For a gluten free version, swap in a 1 to 1 blend and expect them to be slightly more crumbly but still delicious.
- If the dough feels too sticky, chill it for an extra 15 minutes before scooping.
- Add a pinch of cream of tartar to the dry ingredients if you want an even softer texture.
- Check your oven temperature with a thermometer, mine runs hot and I had to drop it to 340°F.
 Save
Save Every time I make these, someone asks for the recipe, and I love that. They're proof that a little color and a lot of butter can turn an ordinary afternoon into something people remember.
Recipe Q&A
- → Why do pink velvet cookies need chilling time?
Refrigerating the dough for 30 minutes helps prevent excessive spreading during baking. This step ensures the cookies maintain their shape, achieve thicker centers, and develop that perfect chewy texture with crisp edges.
- → Can I use liquid food coloring instead of gel?
Gel food coloring is highly recommended because it provides vibrant color without adding excess liquid to the dough. Liquid coloring can alter the dough consistency and affect the final texture. If you must use liquid, add it drop by drop and reduce other liquids slightly.
- → How do I know when pink velvet cookies are done baking?
The cookies are ready when the edges are set and lightly golden but the centers still appear slightly soft and underbaked. They will continue firming up as they cool on the baking sheet. Removing them at the right time guarantees that perfectly chewy texture.
- → What makes white chocolate the best pairing for pink velvet?
White chocolate's creamy, sweet vanilla profile complements the buttery vanilla base without competing with the pink color. The mellow flavor allows the visual appeal to shine while adding pockets of melting richness throughout each bite.
- → Can I freeze the dough or baked cookies?
Yes, both freeze beautifully. Scoop dough balls onto a parchment-lined baking sheet, freeze until solid, then transfer to an airtight container for up to 3 months. Bake from frozen, adding 1-2 minutes. Baked cookies freeze well for up to 2 months and thaw at room temperature.
- → How can I make these pink velvet cookies gluten-free?
Substitute the all-purpose flour with a reliable 1:1 gluten-free flour blend that includes xanthan gum. The texture and taste remain remarkably similar, making these accessible for those with gluten sensitivities while maintaining the vibrant color and chewy consistency.